Siglent is a leader in the oscilloscope market. Both win affordability and features Siglent scopes continue to impress. This review I decided to show how these wonderful scopes can be used by audio professionals to better understand our gear and sounds. This particular scope is in their upper mid range segment with a absolutely stunning display. check out the video below for more details!. Head to Siglent to order one of these or their other scopes today!
Category Archives: SDIY
Live video Building the Synthrotek MST Dual Envelope eurorack module
This is a two part Live stream where I build the Synthrotek MST Dual Envelope kit.
This kit is available from Synthrotek’s Store. You can grab this in kit form as seen here or as a completed module.
The Stream is completely live and I take questions and discuss not just the process of building the module but we talk synths in general. so sit back, and enjoy.
Part 1
Hex Inverter Mutant Snare Eurorack Modular Demo video
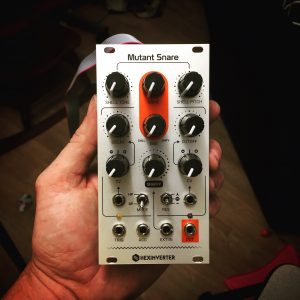
Here Is the Eurorack Modular Hex Inverter Mutant Snare.

This one I built from a kit and I have to say it is really impressive. Check out the video and let me know what you think! https://www.hexinverter.net/mutant-snare Buy the kit here
googleb16701ec85919b47
Hexinverter.net Mutant hot Glue DIY on DRUMS!
In this video I showcase the Hexinverter.net Mutant Hot Glue on the Dave Smith Instruments Tempest drum machine. I show the different flavors of distortion and compression. More to come so stay tuned!
4 Channel Mixer with Effects Send
HexInverter.net Midi2CV Eurorack Module keeps Maschine in sync
Available as a kit or completed module this sucker is deep with features.check it out at Hexinverter.net
The ACXsynth MIDI2CV Eurorack module is an 8HP, 4 channel CV/Gate interface with a robust feature set you can build yourself!
The original circuit and firmware were designed by the talented Alain Coupel of ACXsynth. His design is used here with permission. Dmitry, a forum member, took it upon himself to update the firmware with a slew of new and exciting features!
FEATURES
- 12bit DACs with high quality Intersil opamps for great CV accuracy
- Monophonic mode offers full control of one voice (mod, pitch wheel, etc.) as well as sequencer control (start/stop, reset, sync)
- Split and duophonic modes accessible through advanced features
- Sync output emits MIDI clock pulses for driving sequencers
- MIDI channel auto-learn at startup means no configuration if only basic functionality is desired
How To Synth DIY project part 6 Chaos NAND , Delay etc
Now that the Circuits have all been Built. we can wire them all together. This is really quite straight forward. Simply wire everything in parallel. This means that the power wiring for each module goes directly back to the source. This allows us to not have voltage drop across each component.
make sure to leave plenty of extra wire so that you can place knobs and connectors where ever you want in your enclosure.
I will return shortly to show how everything is mounted in the case and give it a nice run through!
How to Synth DIY part 5 PT2399 Delay Dev board!
Part 5 The PT2399 DEV DELAY KIT
This circuit is actually very very simple to assemble and shouldn’t really take you more than a half hour tops to build.
It comprises of a board with pads for a few knobs and jacks, as well as a few extra parts so that you can play around and add modifications to the circuit. The PT2399 is a chip that is found in MANY guitar delay pedals. It is a digital chip that emulates the analog bucket brigade. As delay times get longer, the audio degrades. This can be used to great effect when you start to play with long delay times and feedback.
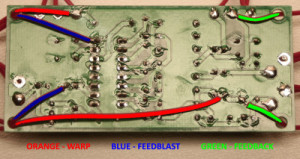
In this video I build the PT2399 Dev board, I do not show me building in any mods. The reason for this is I want you to feel free to experiment with the board. you won’t harm the chip its quite robust and is great fun to play with “circuit bending” it. just basically wire up a momentary switch (included with the kit) and touch the leads to any two points you find interested (by poking a piece of wire around you may find the chip behavior act interesting). For the final circuit I went with the suggested Feedblast the warp and the feedback as pictured below.
instructions for these mods can be found HERE https://www.synthrotek.com/kit-assembly-instructions/other/pt2399-dev-delay-assembly-instructions/
The kit only costs : $30 so… hard to beat for a funky ass delay right?
Check the video and have fun!
How to Synth DIY part 4 ANYONE can Build the 555 LFO!
Yes thats right! Anyone can build the 555 timer LFO… and to prove it, I let my 8 year old daughter do it! This was Elly’s first time soldering and she enjoyed it immensely (even with a minor mishap!) If she can jump on the Synth DIY horse, SO CAN YOU!
The 555 Timer Oscillator from Synthrotek will be a modulation source for our upcoming Delay Dev kit circuit. (and other circuits as we will keep this modular!)
the Idea is to use this to modulate the rate of the delay board.
For this project, we won’t be hooking up power just yet as I plan on daisy chaining the power off of another circuit first.
we also will not solder on the attenuator just yet as we will be using wire so that we can place the board more efficiently inside of the case. You can buy the 555 Timer LFO HERE—> Synthrotek Store it’s only $15.


