
Tag Archives: SDIY
Synthrotek at NAMM 2016 New modules and full systems!
Hexinverter.net Mutant hot Glue DIY on DRUMS!
In this video I showcase the Hexinverter.net Mutant Hot Glue on the Dave Smith Instruments Tempest drum machine. I show the different flavors of distortion and compression. More to come so stay tuned!
4 Channel Mixer with Effects Send
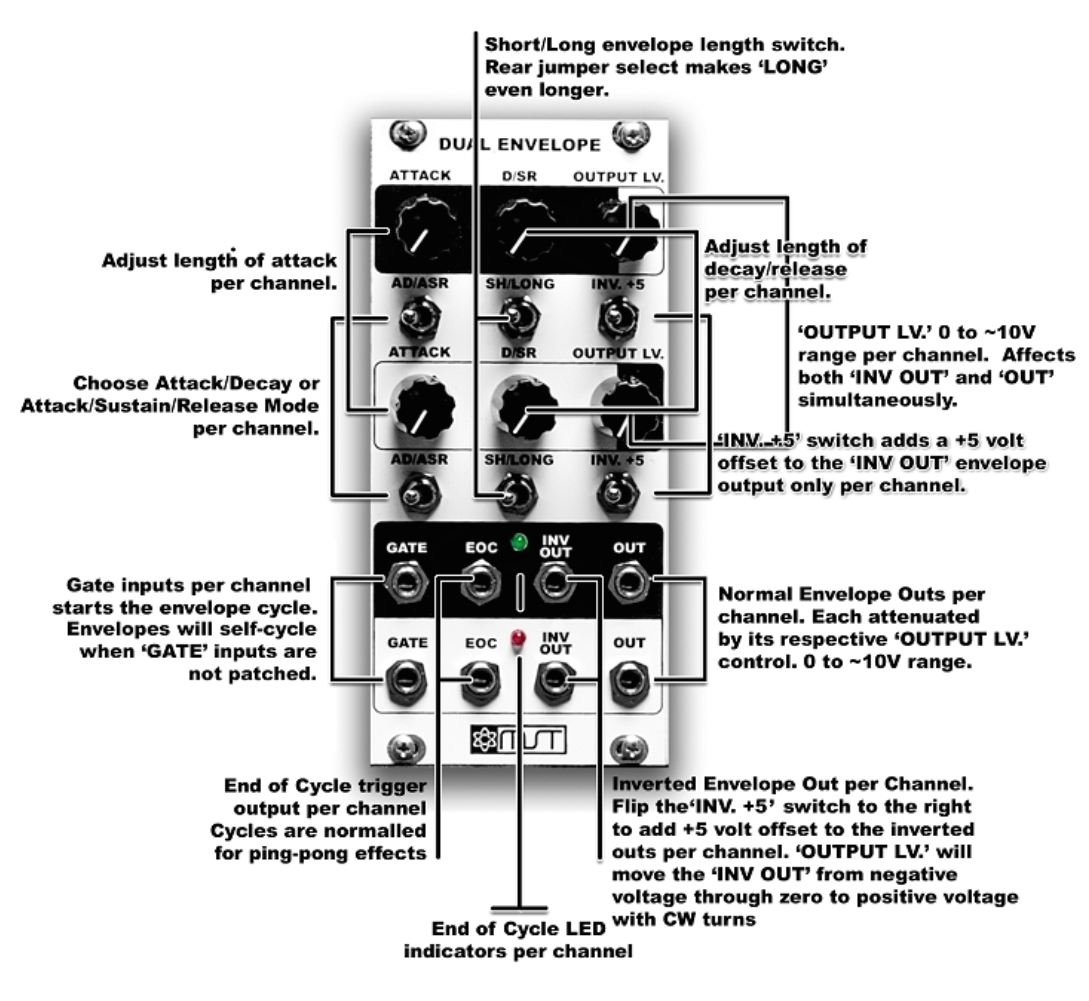
Synthrotek MST Dual Envelope for Eurorack Modular Synth
The MST Dual Envelope is a simple-to-use yet complex dual envelope generator. Channels 1 and 2 are both normalled to each other to cycle when the other respective channel hits end of cycle, allowing for really interesting ping-pong effects. Each channel also has an end-of-cycle trigger output with LED indicator. There’s a normal and inverted envelope out. The inverted envelope out can be further modified by the +5 offset switch, which allows the inverted waveform to travel in the positive. The + output level allows the envelope signal to go between zero and the maximum voltage rail. Attenuate the output level down for a more subtle envelope (adjust to taste).
Features:
Two self-completing envelope circuits
AD or ASR selector switch per channel
Manual Attack control & Decay/Release
Output level per channel
Gate input
End-of-cycle trigger output with LED indicator
Normal & Inverted envelope output per channel
Short and long envelope length switch per channel
Long setting can be lengthened with jumper select
AD/ASR selection switch per channel
Inverted output +5 offset switch per channel
Specifications:
Current draw: V+ max 10mA, V- max 8mA
Width: 12HP
Retail price = $224.99
How To Synth DIY project part 6 Chaos NAND , Delay etc
Now that the Circuits have all been Built. we can wire them all together. This is really quite straight forward. Simply wire everything in parallel. This means that the power wiring for each module goes directly back to the source. This allows us to not have voltage drop across each component.
make sure to leave plenty of extra wire so that you can place knobs and connectors where ever you want in your enclosure.
I will return shortly to show how everything is mounted in the case and give it a nice run through!
How to Synth DIY part 5 PT2399 Delay Dev board!
Part 5 The PT2399 DEV DELAY KIT
This circuit is actually very very simple to assemble and shouldn’t really take you more than a half hour tops to build.
It comprises of a board with pads for a few knobs and jacks, as well as a few extra parts so that you can play around and add modifications to the circuit. The PT2399 is a chip that is found in MANY guitar delay pedals. It is a digital chip that emulates the analog bucket brigade. As delay times get longer, the audio degrades. This can be used to great effect when you start to play with long delay times and feedback.
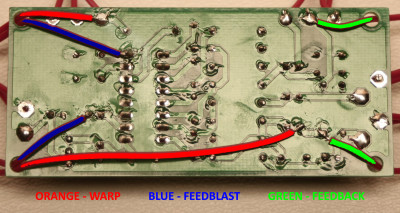
In this video I build the PT2399 Dev board, I do not show me building in any mods. The reason for this is I want you to feel free to experiment with the board. you won’t harm the chip its quite robust and is great fun to play with “circuit bending” it. just basically wire up a momentary switch (included with the kit) and touch the leads to any two points you find interested (by poking a piece of wire around you may find the chip behavior act interesting). For the final circuit I went with the suggested Feedblast the warp and the feedback as pictured below.
instructions for these mods can be found HERE https://www.synthrotek.com/kit-assembly-instructions/other/pt2399-dev-delay-assembly-instructions/
The kit only costs : $30 so… hard to beat for a funky ass delay right?
Check the video and have fun!
How to Synth DIY part 4 ANYONE can Build the 555 LFO!
Yes thats right! Anyone can build the 555 timer LFO… and to prove it, I let my 8 year old daughter do it! This was Elly’s first time soldering and she enjoyed it immensely (even with a minor mishap!) If she can jump on the Synth DIY horse, SO CAN YOU!
The 555 Timer Oscillator from Synthrotek will be a modulation source for our upcoming Delay Dev kit circuit. (and other circuits as we will keep this modular!)
the Idea is to use this to modulate the rate of the delay board.


For this project, we won’t be hooking up power just yet as I plan on daisy chaining the power off of another circuit first.
we also will not solder on the attenuator just yet as we will be using wire so that we can place the board more efficiently inside of the case. You can buy the 555 Timer LFO HERE—> Synthrotek Store it’s only $15.
This series is supported by ![]()
and from sales of My Sound libraries at ![]()
How to Synth DIY part 3 The Passive Ring Modulator
The Passive Ring Modulator
This circuit is a very basic one which is why I have chosen it to be our starting point. It is also quite inexpensive with very easy soldering so it should make a great first time soldering project!
A ring Modulator basically takes two incoming signals and combines them spitting out what results in a modulated version of the original signal. This technique was used to create the famous Dalek voices in DR. Who television series.
It can also be used to beef up synth signals, Warp Drum tones, and distort strings etc. overall just a very useful circuit to have handy.
The Passive Ring Mod doesn’t require a power source so no worries there.
Take a look at the video and Have FUN!!!
Here is the Link for Synthrotek’s Passive Ring Mod https://www.synthrotek.com/kit-assembly-instructions/other/passive-ring-modulator-assembly-instructions/
This series is supported by ![]()
and from sales of My Sound libraries at ![]()