Zodiak by Funk/Soul Productions Dark themed Kontakt library


Screen Shot 2015-02-22 at 11.52.24 AM


Zodiac is a unique-sounding Virtual Instrument designed to provide composers and producers with a collection of original sounds and instruments suitable for film or TV scores, video games, and all types of ambient and experimental music.

No synthesizers were used to create the instruments in Zodiac. Instead, all instruments were created from organic sources such as found sounds, sonic manipulations inspired by classic Musique Concrete, Experimental and Avant Garde Music compositions, prepared or heavily processed musical instruments, and audio recordings subjected to extreme sound design techniques.

Zodiac features over 200 patches and Multis (over 8GB of uncompressed wav data), divided into six categories:

Pads & Atmospheres
Melodic Instruments
Bass Instruments
Percussive Instruments
Experimental Instruments
Zodiac Kits

Available now for $199.00 from Bigfishaudio.com

https://www.bigfishaudio.com/detail.html?4;16;1:::::::1681:::D1681::516870#

How to Synth DIY part 5 PT2399 Delay Dev board!

Part 5 The PT2399 DEV DELAY KIT


This circuit is actually very very simple to assemble and shouldn’t really take you more than a half hour tops to build.

It comprises of a board with pads for a few knobs and jacks, as well as a few extra parts so that you can play around and add modifications to the circuit. The PT2399 is a chip that is found in MANY guitar delay pedals. It is a digital chip that emulates the analog bucket brigade. As delay times get longer, the audio degrades. This can be used to great effect when you start to play with long delay times and feedback.

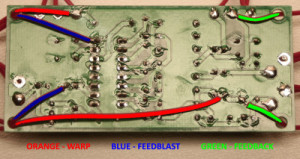
In this video I build the PT2399 Dev board, I do not show me building in any mods. The reason for this is I want you to feel free to experiment with the board. you won’t harm the chip its quite robust and is great fun to play with “circuit bending” it. just basically wire up a momentary switch (included with the kit) and touch the leads to any two points you find interested (by poking a piece of wire around you may find the chip behavior act interesting). For the final circuit I went with the suggested Feedblast the warp and the feedback as pictured below.

devmods_4-400x213


instructions for these mods can be found HERE https://www.synthrotek.com/kit-assembly-instructions/other/pt2399-dev-delay-assembly-instructions/

The kit only costs : $30 so… hard to beat for a funky ass delay right?

Check the video and have fun!

How to Synth DIY part 4 ANYONE can Build the 555 LFO!

Yes thats right! Anyone can build the 555 timer LFO… and to prove it, I let my 8 year old daughter do it! This was Elly’s first time soldering and she enjoyed it immensely (even with a minor mishap!) If she can jump on the Synth DIY horse, SO CAN YOU!


The 555 Timer Oscillator from Synthrotek will be a modulation source for our upcoming Delay Dev kit circuit. (and other circuits as we will keep this modular!)

the Idea is to use this to modulate the rate of the delay board.

Screen Shot 2015-01-11 at 9.27.39 AM  ellyMS20


For this project, we won’t be hooking up power just yet as I plan on daisy chaining the power off of another circuit first.

we also will not solder on the attenuator just yet as we will be using wire so that we can place the board more efficiently inside of the case. You can buy the 555 Timer LFO HERE—> Synthrotek Store  it’s only $15.

This series is supported by Synthrotek logo

and from sales of My Sound libraries at Screen Shot 2015-01-11 at 10.03.36 AM

How to Synth DIY part 3 The Passive Ring Modulator

The Passive Ring Modulator


This circuit is a very basic one which is why I have chosen it to be our starting point. It is also quite inexpensive with very easy soldering so it should make a great first time soldering project!

A ring Modulator basically takes two incoming signals and combines them spitting out what results in a modulated version of the original signal. This technique was used to create the famous Dalek voices in DR. Who television series.

It can also be used to beef up synth signals, Warp Drum tones, and distort strings etc. overall just a very useful circuit to have handy.

The Passive Ring Mod doesn’t require a power source so no worries there.

Take a look at the video and Have FUN!!!

Here is the Link for Synthrotek’s Passive Ring Mod https://www.synthrotek.com/kit-assembly-instructions/other/passive-ring-modulator-assembly-instructions/


This series is supported by Synthrotek logo

and from sales of My Sound libraries at Screen Shot 2015-01-11 at 10.03.36 AM

Synth DIY Project series Part 1 (getting into Synth DIY)

Screen Shot 2014-12-29 at 3.20.37 PM

How to Synth DIY


Synthrotek logo

          Here at FluxWithIt.com there is a mind set… If you are not thinking beyond intended operation, then you are limiting yourself.  To better illustrate this philosophy as it pertains to the studio. I have decided to take you all with me on down the rabbit whole and into a land where an old guitar pedal is a synth, a simple 555 timer chip is a modulation source, a plain plastic box can become a sample manglers wet dream. Luckily with Sponsor Synthrotek I will be able to help you on your journey to Nerd heaven.

Before we take the blue pill and get to tripped out on bending and circuit melding, Lets gather our thoughts.

First we need to assess just what it is we SHOULD know before attempting any of this.

here are some bullet points of what I feel you should know… and I will help assist you in learning. Continue reading

Synthrotek DS-M Drum Synthesizer Module for Eurorack


the Synthrotek DS-M is an awesome new Drum synth Module for Eurorack.
The DS-M is a full featured drum synth that can emulate virtually any drum sound!

The DS-M (Drum Synth Module) is a complex, modifiable, 100% analog drum synth loosely based on the Coron DS-8 and neatly packaged into an 8hp module.

Continue reading

How to Mod the Arturia Minibrute and Microbrute! (add LFO out and Waveform Out!)

Modding the Minibrute

For some time now I have really loved the Brute series from Arturia. I also tend to be the type of person to just never be satisfied even when things are going great. So today I decided to modify my brutes.  The one feature I always wished the Minibrute had was LFO output so that it could be used to control my modular.  Well today I rectified that problem with a simple mod that you can do with very basic tools.

All that is needed is a few mono 1/8″ jacks, some wire, some solder, a soldering iron, a screw driver and a drill.

Here is a list of the solder points and what they are. The video below details not only how to perform this mod, but how to actually find these types of modifications yourself!

Minibrute waveform output list

—- LFO OUTS :

PT34 = SAW LFO , PT32 = TRIANGLE LFO, PT35 = SINE LFO, PT33 SQUARE LFO, PT130 = RANDOM LFO,

PT176 SELECTED LFO

——-    VCO OUTS :

PT180 = SQUARE SUB VCO, PT7 = SQUARE VCO, PT119 = TRIANGLE VCO, PT120 = SAW VCO

—————-

MICROBRUTE

TP93= SQUARE VCO, TP94 = SAW VCO, TP102 = SUB VCO, TP124 = TRIANGLE VCO