How to Synth DIY part 5 PT2399 Delay Dev board!

Part 5 The PT2399 DEV DELAY KIT


This circuit is actually very very simple to assemble and shouldn’t really take you more than a half hour tops to build.

It comprises of a board with pads for a few knobs and jacks, as well as a few extra parts so that you can play around and add modifications to the circuit. The PT2399 is a chip that is found in MANY guitar delay pedals. It is a digital chip that emulates the analog bucket brigade. As delay times get longer, the audio degrades. This can be used to great effect when you start to play with long delay times and feedback.

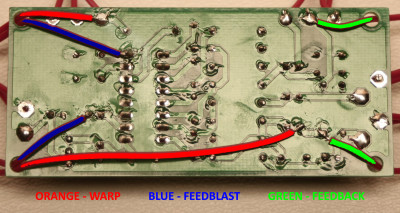
In this video I build the PT2399 Dev board, I do not show me building in any mods. The reason for this is I want you to feel free to experiment with the board. you won’t harm the chip its quite robust and is great fun to play with “circuit bending” it. just basically wire up a momentary switch (included with the kit) and touch the leads to any two points you find interested (by poking a piece of wire around you may find the chip behavior act interesting). For the final circuit I went with the suggested Feedblast the warp and the feedback as pictured below.

devmods_4-400x213


instructions for these mods can be found HERE https://www.synthrotek.com/kit-assembly-instructions/other/pt2399-dev-delay-assembly-instructions/

The kit only costs : $30 so… hard to beat for a funky ass delay right?

Check the video and have fun!

post

HOW to Synth DIY Series Part 2 (Kit list and soldering info)

How to synth DIY part 2

Synthrotek logo

Now that we have established some basics it is time to take a look at what we are actually going to be doing in this series. I want to start off by giving a list of the Synthrotek Kits we will need in order to complete this series. You can purchase these kits as we go along or all of them upfront (getting them upfront is not a bad idea as we will likely have some live Q&A sessions and it will be nice for you to have the kits ready).

Here are the planned kits that will be involved.

1) Passive Ring Mod Kit (think Dalek voice)

2) 4093 Chaoss Nand kit (drone oscillator)

3) 555 Timer kit (this will be used as an LFO to control delay etc)

4) Dirt Filter 9v kit (distortion and filtering)

5) PT2399 Dev Board kit  (this is a digital delay that emulates analog delay chips)

6 Vac Pack (adds CV control to any variable resistance controlled circuit)

7) Plastic Enclosure  (this will be what we place all our items into) you are not limited to use just this case, feel free to use more than one case or a larger case if you like.

Continue reading

Korg Kp2 Kaoss pad Pad motion Toggle Mod

Korg Kaoss Pad 2 always lacked one thing


I love the Kaoss pad kp2 but it always lacked a very simple feature. The ability to play your XY modulations without having to touch the unit.  Well today I finally got sick of that lack of functionality and decided to do something about it.  By installing a simple single throw single pole toggle switch I am now able to trigger my Pad motion without holding down the spring loaded toggle switch. why korg didn’t simply include a button for this is far beyond me but hey, the mod is quite simple and straight forward.


First I took out my multi meter and checked the pins to find where continuity would be breaking and making.

20140421_121817 once you have located the placement of the switch wires to make a path for the switch. remove the microphone input board gently.KP2mod1edit20140421_124134
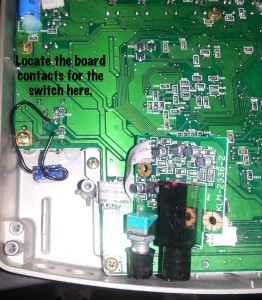
Usiing a Dremel tool make a whole where you want the switch keeping in mind that you need to keep the switch close to the main board so that you don’t hit the capacitors when you reinstall the microphone board.20140421_124607
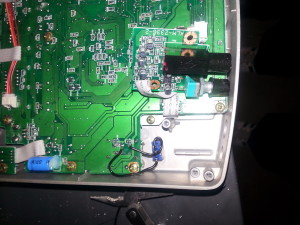
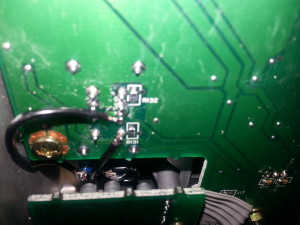
Solder the wiring one leg to each side of the switch. be careful not to over heat the board. If possible bend away any tabs that might come in contact with the microphone board to prevent shorts

20140421_124554Reinstall the microphone board and put all the screws back in place. you are now ready to have fun !

Synthrotek EKO building and Demo video

I love doing Eurorack kits. They are more affordable than assembled versions. They give you the satisfaction of actually having a hand in the quality of your module. It is simply a load of fun to know that you helped create this new sound source in your set up.

That being said, I have yet to do a video showing how I build the kits and get them up and running so here is  a short video showing the latest addition to my Eurorack Modular synth. the Synthrotek EKO

available here

Assembled version here–> https://store.synthrotek.com/EKO_Voltage_Controlled_Echo

Kit version here —> https://store.synthrotek.com/EKO_Voltage_Controlled_Echo_Kit

Product info:
– Rate range: 30-190mS
– 4HP
– Voltage-controlled rate
– Self-oscillating feedback
– Mix control
– Hand-assembled in Portland, Oregon
Enjoy!


XXX_OR from Animdoule for Eurorack modular

Here is a new Module from Eurorack Module maker Animodule.
This is the Triple Exclusive Or “XXX_OR”

It is essentially a logic module that takes up to 6 inputs and combine them to shape the Analog outputs (3) and Gate outputs (3) into interesting sounds and CV. each input is Buffered to the next along with a slight overdrive so each output can get you more shaping. There are so many ways to use this I am needing to do a few videos. (Ring Mod, FM sourcing, Distortion just to name a few)

These are available NOW!

One of the Best Filter and FX plug ins for Maschine? CamelPhat for sure!

I am a huge fan of good filters and multi effect plug ins. I horde them like golden treasures and use them often. Recently I had the pleasure of coming across CamelPhat from Camel audio. In its latest version (3.5 as of this writing) I am finding my self using it more and more often. Everything from side chaining a bass line with the LFO pumping away, to Resonating distortion on my snares to warm subtle tube saturation on a rhodes patch all the way out to moving swirling flangers and hectic rhytmic pulses. Camelphat seems to do all this not only while staying light on the cpu but being laid out in such a way its incredibly fast and intuitive to use right from the maschine hardware.
Here is a list of some of the features in this plug.

Features

  • ‘Phattening’ multi-effect, great for punchy drums, bass and lots more.
  • Four distortion modules; warm and soft to crunchy and fat.
  • Magic EQ, compressor, three filters, two LFOs, envelope follower.
  • Easy-to-use, with X/Y pad and intelligent Randomize.
  • 300 categorised presets.

Be sure to check out https://www.camelaudio.com/index.php I am really impressed by the sound of this one.

Creating your own sounds Pt. 7 ( Simply Green)

Simply Green
The art of
Reusing sound

Once you have a collection of sounds you may want to reuse them without them sounding the same.
There are many techniques that don’t require an awful lot of work to sculpt a drum to an individual track. One of the easiest improvements to a sound is to Tune your kick drums to your bass line. This can prevent clashing of sound and drastically improve a mix. If you have a long ringing 808 style kick you can toss a tuner such as guitar rig over the sound and watch what key the drum is tuned to. By simply pitching up or down you can tune it to the key of your bass line. simply throw a tuner (guitar rig for example) onto your kick track is a dirty fast way to get an idea of your kick or you can use a spectrum analyzer and look at where the harmonic frequencies are prominent. though I tend to just use my ears for this process.
Another great way to sculpt a pre made drum is by using bit crushing or distortion. Adding subtle to drastic hints of lo-fi to a pristine sample can really change the overall sound of a kit and create a drum sound totally new.
Don’t forget filtering and layering of premade sounds as well. And always keep an eye on your levels. When stacking premade drums it’s very easy to start clipping so turn it down a bit and you shall be fine. Adding harmonics to a sound can be a great way to alter a drum or instrument as well. adding Ring modulators and tuning the ring mod then resampling is a great way to enhance a sound. There are pleny of options and ways to do this. Everything from guitar plug ins and actual hardware fx pedals to Reaktor ensembles to simply getting creative with the EQ.
Also a spectrum analyzer can help you see trouble frequencies you might not be hearing such as increased bass tones below 40hz that are causing mixes to peak even though they sound quiet. Simply filter them out or use a sculpting EQ.
Sometimes simply routing sounds out of your computer and through something simple like a korg monotron or a aha pedal can change the sound just enough to make it feel new and fresh to you. Experiment and have fun with it.