HexInverter.net Midi2CV Eurorack Module keeps Maschine in sync

Available as a kit or completed module this sucker is deep with features.check it out at Hexinverter.net

The ACXsynth MIDI2CV Eurorack module is an 8HP, 4 channel CV/Gate interface with a robust feature set you can build yourself!

The original circuit and firmware were designed by the talented Alain Coupel of ACXsynth. His design is used here with permission. Dmitry, a forum member, took it upon himself to update the firmware with a slew of new and exciting features!


FEATURES


  • 12bit DACs with high quality Intersil opamps for great CV accuracy
  • Monophonic mode offers full control of one voice (mod, pitch wheel, etc.) as well as sequencer control (start/stop, reset, sync)
  • Split and duophonic modes accessible through advanced features
  • Sync output emits MIDI clock pulses for driving sequencers
  • MIDI channel auto-learn at startup means no configuration if only basic functionality is desired

Analogue Solutions ships space-saving real analogue monosynth module with SEM-style filter

British ‘boutique’ analogue synthesiser and accessory designer/manufacturer Analogue Solutions is proud to announce availability of its all-new Nyborg-12 — an Oberheim SEM-style 2-Pole 12dB/Octave MULTIMODE FILTER-equipped standalone monophonic synthesiser module with real analogue voice and modulation circuitry

front-flat

An analogue renaissance has ensured that the one-time state-of-the-art sounds of analogue synthesisers have long since become highly sought after again. Why? Well, many musicians realised that the convoluted menu-driven access systems deployed on many ‘modern-day’ digital synthesisers with weaker sounds bathed in built-in effects are no substitute for the hands-on immediacy of having access to a control per function at hand when it comes to speedy sculpting of ear-opening and often powerful electronic sounds suited to a variety of musical genres. With more mainstream recording artists and producers than ever now relying on custom sounds as a result of this rising and renewed interest in analogue (subtractive) synthesis, is it any wonder, then, that yesteryear’s often wonderful-sounding (though not necessarily reliable) analogue classics are rapidly rising in value, pushing them out of reach of many musicians of more meagre means? Meeting this demand head on, more analogue synthesisers than ever before are available today from manufacturers both bigger and smaller. Into this healthy and highly-competitive climate comes Analogue Solutions’ latest analogue offering, the Nyborg-12 SEM synthesiser — so-called on account of its 2-Pole 12dB/Octave MULTIMODE FILTER, the same flexible filter with LP (lowpass), BP (bandpass), HP (high pass), and NOTCH settings that is used on Analogue Solutions’ own Telemark SEM semi-modular synthesiser, similar (though not identical) to Tom Oberheim’s original 1974-vintage SEM (Synthesizer Expander Module®), much sought after itself.

Continue reading

How to Synth DIY part 5 PT2399 Delay Dev board!

Part 5 The PT2399 DEV DELAY KIT


This circuit is actually very very simple to assemble and shouldn’t really take you more than a half hour tops to build.

It comprises of a board with pads for a few knobs and jacks, as well as a few extra parts so that you can play around and add modifications to the circuit. The PT2399 is a chip that is found in MANY guitar delay pedals. It is a digital chip that emulates the analog bucket brigade. As delay times get longer, the audio degrades. This can be used to great effect when you start to play with long delay times and feedback.

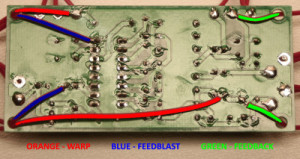
In this video I build the PT2399 Dev board, I do not show me building in any mods. The reason for this is I want you to feel free to experiment with the board. you won’t harm the chip its quite robust and is great fun to play with “circuit bending” it. just basically wire up a momentary switch (included with the kit) and touch the leads to any two points you find interested (by poking a piece of wire around you may find the chip behavior act interesting). For the final circuit I went with the suggested Feedblast the warp and the feedback as pictured below.

devmods_4-400x213


instructions for these mods can be found HERE https://www.synthrotek.com/kit-assembly-instructions/other/pt2399-dev-delay-assembly-instructions/

The kit only costs : $30 so… hard to beat for a funky ass delay right?

Check the video and have fun!

How to Synth DIY part 3 The Passive Ring Modulator

The Passive Ring Modulator


This circuit is a very basic one which is why I have chosen it to be our starting point. It is also quite inexpensive with very easy soldering so it should make a great first time soldering project!

A ring Modulator basically takes two incoming signals and combines them spitting out what results in a modulated version of the original signal. This technique was used to create the famous Dalek voices in DR. Who television series.

It can also be used to beef up synth signals, Warp Drum tones, and distort strings etc. overall just a very useful circuit to have handy.

The Passive Ring Mod doesn’t require a power source so no worries there.

Take a look at the video and Have FUN!!!

Here is the Link for Synthrotek’s Passive Ring Mod https://www.synthrotek.com/kit-assembly-instructions/other/passive-ring-modulator-assembly-instructions/


This series is supported by Synthrotek logo

and from sales of My Sound libraries at Screen Shot 2015-01-11 at 10.03.36 AM

post

HOW to Synth DIY Series Part 2 (Kit list and soldering info)

How to synth DIY part 2

Synthrotek logo

Now that we have established some basics it is time to take a look at what we are actually going to be doing in this series. I want to start off by giving a list of the Synthrotek Kits we will need in order to complete this series. You can purchase these kits as we go along or all of them upfront (getting them upfront is not a bad idea as we will likely have some live Q&A sessions and it will be nice for you to have the kits ready).

Here are the planned kits that will be involved.

1) Passive Ring Mod Kit (think Dalek voice)

2) 4093 Chaoss Nand kit (drone oscillator)

3) 555 Timer kit (this will be used as an LFO to control delay etc)

4) Dirt Filter 9v kit (distortion and filtering)

5) PT2399 Dev Board kit  (this is a digital delay that emulates analog delay chips)

6 Vac Pack (adds CV control to any variable resistance controlled circuit)

7) Plastic Enclosure  (this will be what we place all our items into) you are not limited to use just this case, feel free to use more than one case or a larger case if you like.

Continue reading

Animodule GATE_MOD Eurorack Modular trigger delay

Let’s face it, couldn’t we ALL use a little more length?

This Tiny (yet powerful) Module allows you to manipulate your gate length and delay your event triggers with ease and minimal impact on your HP.

Take an incoming Signal above ~1.1V (OpAmp Comparators on the Inputs make very forgiving Clock Inputs)
and shrink it down to 5MS or lengthen it up to 5 Seconds.
That Gate will appear at the Gate Out. Continue reading

Synthrotek DS-M Drum Synthesizer Module for Eurorack


the Synthrotek DS-M is an awesome new Drum synth Module for Eurorack.
The DS-M is a full featured drum synth that can emulate virtually any drum sound!

The DS-M (Drum Synth Module) is a complex, modifiable, 100% analog drum synth loosely based on the Coron DS-8 and neatly packaged into an 8hp module.

Continue reading

How to Mod the Arturia Minibrute and Microbrute! (add LFO out and Waveform Out!)

Modding the Minibrute

For some time now I have really loved the Brute series from Arturia. I also tend to be the type of person to just never be satisfied even when things are going great. So today I decided to modify my brutes.  The one feature I always wished the Minibrute had was LFO output so that it could be used to control my modular.  Well today I rectified that problem with a simple mod that you can do with very basic tools.

All that is needed is a few mono 1/8″ jacks, some wire, some solder, a soldering iron, a screw driver and a drill.

Here is a list of the solder points and what they are. The video below details not only how to perform this mod, but how to actually find these types of modifications yourself!

Minibrute waveform output list

—- LFO OUTS :

PT34 = SAW LFO , PT32 = TRIANGLE LFO, PT35 = SINE LFO, PT33 SQUARE LFO, PT130 = RANDOM LFO,

PT176 SELECTED LFO

——-    VCO OUTS :

PT180 = SQUARE SUB VCO, PT7 = SQUARE VCO, PT119 = TRIANGLE VCO, PT120 = SAW VCO

—————-

MICROBRUTE

TP93= SQUARE VCO, TP94 = SAW VCO, TP102 = SUB VCO, TP124 = TRIANGLE VCO