In this video I showcase the Hexinverter.net Mutant Hot Glue on the Dave Smith Instruments Tempest drum machine. I show the different flavors of distortion and compression. More to come so stay tuned!

In this video I showcase the Hexinverter.net Mutant Hot Glue on the Dave Smith Instruments Tempest drum machine. I show the different flavors of distortion and compression. More to come so stay tuned!
Now that the Circuits have all been Built. we can wire them all together. This is really quite straight forward. Simply wire everything in parallel. This means that the power wiring for each module goes directly back to the source. This allows us to not have voltage drop across each component.
make sure to leave plenty of extra wire so that you can place knobs and connectors where ever you want in your enclosure.
I will return shortly to show how everything is mounted in the case and give it a nice run through!
This circuit is actually very very simple to assemble and shouldn’t really take you more than a half hour tops to build.
It comprises of a board with pads for a few knobs and jacks, as well as a few extra parts so that you can play around and add modifications to the circuit. The PT2399 is a chip that is found in MANY guitar delay pedals. It is a digital chip that emulates the analog bucket brigade. As delay times get longer, the audio degrades. This can be used to great effect when you start to play with long delay times and feedback.
In this video I build the PT2399 Dev board, I do not show me building in any mods. The reason for this is I want you to feel free to experiment with the board. you won’t harm the chip its quite robust and is great fun to play with “circuit bending” it. just basically wire up a momentary switch (included with the kit) and touch the leads to any two points you find interested (by poking a piece of wire around you may find the chip behavior act interesting). For the final circuit I went with the suggested Feedblast the warp and the feedback as pictured below.
instructions for these mods can be found HERE https://www.synthrotek.com/kit-assembly-instructions/other/pt2399-dev-delay-assembly-instructions/
The kit only costs : $30 so… hard to beat for a funky ass delay right?
Check the video and have fun!

Now that we have established some basics it is time to take a look at what we are actually going to be doing in this series. I want to start off by giving a list of the Synthrotek Kits we will need in order to complete this series. You can purchase these kits as we go along or all of them upfront (getting them upfront is not a bad idea as we will likely have some live Q&A sessions and it will be nice for you to have the kits ready).
Here are the planned kits that will be involved.
1) Passive Ring Mod Kit (think Dalek voice)
2) 4093 Chaoss Nand kit (drone oscillator)
3) 555 Timer kit (this will be used as an LFO to control delay etc)
4) Dirt Filter 9v kit (distortion and filtering)
5) PT2399 Dev Board kit (this is a digital delay that emulates analog delay chips)
6 Vac Pack (adds CV control to any variable resistance controlled circuit)
7) Plastic Enclosure (this will be what we place all our items into) you are not limited to use just this case, feel free to use more than one case or a larger case if you like.
I love the Kaoss pad kp2 but it always lacked a very simple feature. The ability to play your XY modulations without having to touch the unit. Well today I finally got sick of that lack of functionality and decided to do something about it. By installing a simple single throw single pole toggle switch I am now able to trigger my Pad motion without holding down the spring loaded toggle switch. why korg didn’t simply include a button for this is far beyond me but hey, the mod is quite simple and straight forward.
First I took out my multi meter and checked the pins to find where continuity would be breaking and making.
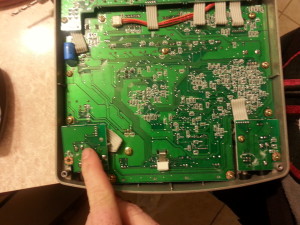 once you have located the placement of the switch wires to make a path for the switch. remove the microphone input board gently.
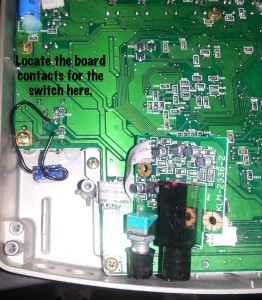
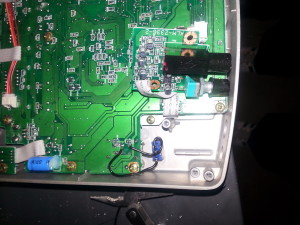 Usiing a Dremel tool make a whole where you want the switch keeping in mind that you need to keep the switch close to the main board so that you don’t hit the capacitors when you reinstall the microphone board.
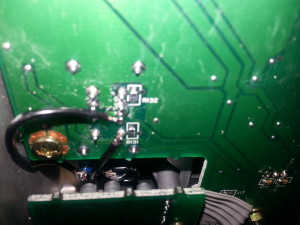 Solder the wiring one leg to each side of the switch. be careful not to over heat the board. If possible bend away any tabs that might come in contact with the microphone board to prevent shorts
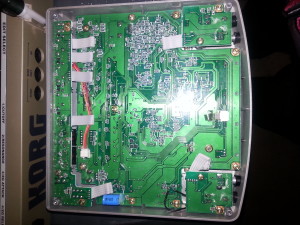 Reinstall the microphone board and put all the screws back in place. you are now ready to have fun !
I love doing Eurorack kits. They are more affordable than assembled versions. They give you the satisfaction of actually having a hand in the quality of your module. It is simply a load of fun to know that you helped create this new sound source in your set up.
That being said, I have yet to do a video showing how I build the kits and get them up and running so here is a short video showing the latest addition to my Eurorack Modular synth. the Synthrotek EKO
available here
Assembled version here–> https://store.synthrotek.com/EKO_Voltage_Controlled_Echo
Kit version here —> https://store.synthrotek.com/EKO_Voltage_Controlled_Echo_Kit